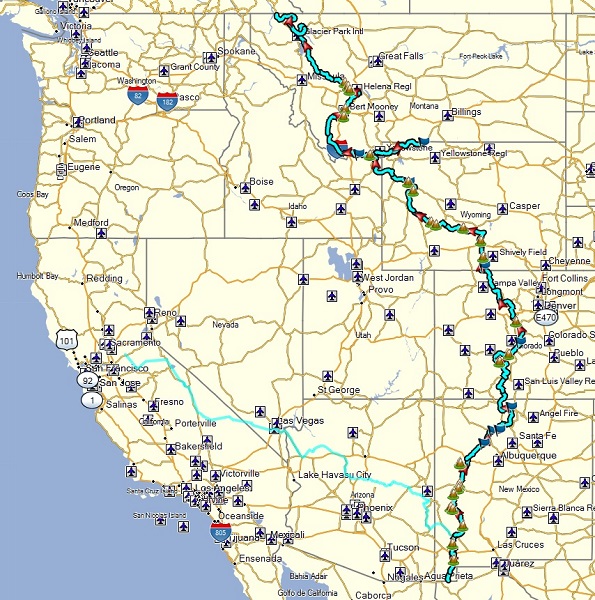
Great Continental Divide Adventure Ride
13 days from Mexico to Canada off-road by motorcycle
 Incredible,
arduous, and unforgettable. These three words seem to best describe
the experience of this motorcycle ride. Primarily off-road (80-90%),
from Mexico to Canada, the route roughly follows the spine of the
Continental Divide, the geographic dividing line separating the western and
eastern halves of the US. Water on the west side flows to the Pacific, while
that on the east flows to the Atlantic. The ride took 13 days
(including a 1 day layover to explore Yellowstone), with a
length of about 3000 miles border to border, with the starting point at
Silver City, New Mexico, and ending at the town of Roosville, Montana.
The terrain varied each day, ranging anywhere from asphalt and gravel roads,
to steep rocky terrain, sand, or mud. This variety kept the ride
challenging, constantly testing your skills and tenacity, along with your
bike's abilities.
Incredible,
arduous, and unforgettable. These three words seem to best describe
the experience of this motorcycle ride. Primarily off-road (80-90%),
from Mexico to Canada, the route roughly follows the spine of the
Continental Divide, the geographic dividing line separating the western and
eastern halves of the US. Water on the west side flows to the Pacific, while
that on the east flows to the Atlantic. The ride took 13 days
(including a 1 day layover to explore Yellowstone), with a
length of about 3000 miles border to border, with the starting point at
Silver City, New Mexico, and ending at the town of Roosville, Montana.
The terrain varied each day, ranging anywhere from asphalt and gravel roads,
to steep rocky terrain, sand, or mud. This variety kept the ride
challenging, constantly testing your skills and tenacity, along with your
bike's abilities.
I did this ride as part of larger group of 19 other like-minded adventure motorcyclists as organized by “GPS Kevin”. It was a diverse group of riders originating from all across the US, spanning from Hawaii to New York. Most also have a lot of experience in the dirt, and like myself, also owning a dual sport bike. During the ride we broke into smaller groups, and typically of similar riding skills, ranging from 3 to 6 in order to keep things more efficient, and to also maintain a support network in case of difficulties along the way. This ended up working out quite well, as invariably issues did arise from flat tires, burned out clutches, crashes with broken bones, to being stuck in deep mud or sand. Riding in small teams allowed everyone to make it the destination for each day’s end point, albeit sometimes a bit more worse for wear.
For overnight accommodations, we stayed in mostly modest motels, sharing a room each night with one other rider. One big advantage of the GPS Kevin rides, is that a support truck will travel to the motel for each day’s destination, carrying one duffel bag with your overnight gear, thus reducing what you need to carry on the bike each day of the ride. However if you are broken down or otherwise find yourself in trouble, don’t expect the truck to come to your rescue, as that is primarily between you and your immediate team, while the truck may not necessarily be able reach your location or be within cell phone coverage depending on where you are. There are other organized more expensive rides that are more structured and full service if this barebones approach is not for you.
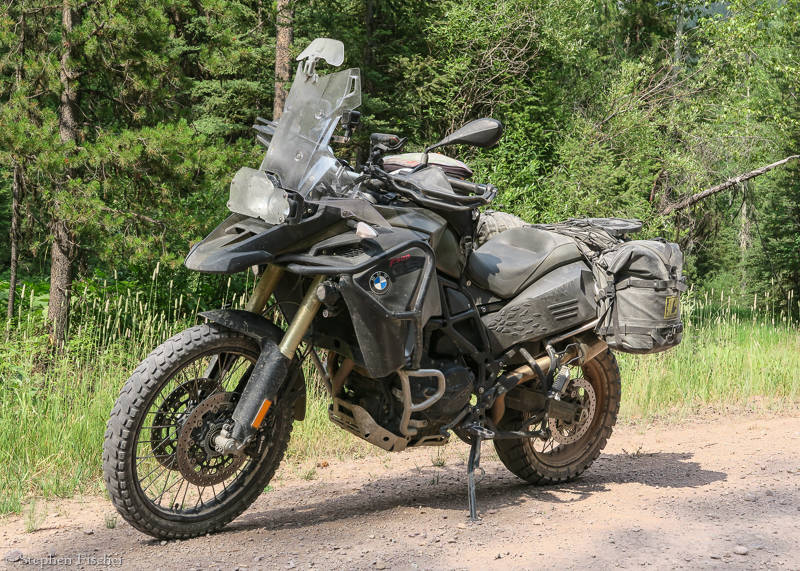 I took the CDR on my 2015 BMW F800GS Adventure
bike, outfitted with additional upper crash bars, reinforced bar guards,
beefier skid plate, and a compliment of tools including a small 12V air
compressor and spare tubes for both the front and rear tires. With
this additional armor and accessories, the bike weighs 530 pounds wet with a
6.3 gallon tank. To keep the bike a bit lighter and better handle the
inevitable off-road crashes, I decided to forego my fancy BMW aluminum
panniers, using Wolfman soft saddlebags instead. I also carried a fuel
siphon hose and spare liter MSR bottle with gas in one pannier for
emergencies. For tires I decided on a relatively fresh set of Heidenau K60
Scouts
for the front and rear, primarily based on their reputations for longevity
and reasonable 50/50 performance. Given it was about 1200 miles to the
start from my place in Sacramento, CA, and 1300 miles back home from the
Canadian border, I needed a setup that would hold up for the total ride of
5500 miles across this diversity of terrain.
I took the CDR on my 2015 BMW F800GS Adventure
bike, outfitted with additional upper crash bars, reinforced bar guards,
beefier skid plate, and a compliment of tools including a small 12V air
compressor and spare tubes for both the front and rear tires. With
this additional armor and accessories, the bike weighs 530 pounds wet with a
6.3 gallon tank. To keep the bike a bit lighter and better handle the
inevitable off-road crashes, I decided to forego my fancy BMW aluminum
panniers, using Wolfman soft saddlebags instead. I also carried a fuel
siphon hose and spare liter MSR bottle with gas in one pannier for
emergencies. For tires I decided on a relatively fresh set of Heidenau K60
Scouts
for the front and rear, primarily based on their reputations for longevity
and reasonable 50/50 performance. Given it was about 1200 miles to the
start from my place in Sacramento, CA, and 1300 miles back home from the
Canadian border, I needed a setup that would hold up for the total ride of
5500 miles across this diversity of terrain.
The range of bikes for the other riders covered the gamut. That along with the tire choices gave some additional insights into what rides seemed to work best, and what not-so-much. I will list the bikes here from smallest to largest:
Yamaha WR250R
KTM 500EXC
BMW 650 GS
BMW 650 GX
Suzuki V-Strom 650
KTM 690 (2)
BMW F 800 GS Adv (author's)
KTM 990R (2)
Honda Africa Twin 1000 (1 DCT and 3 non-DCTs)
Yamaha Super Tenere 1100
KTM 1190R
BMW R 1200 GS Rallye
BMW R 1200 GS
KTM 1290
I think the medium sized bikes had the most versatility between range and terrain. Obviously the smaller bikes could better handle the more technical stuff and do circles around the other riders (e.g. WR250R and KTM 500EXC), but have range issues and more likely had to be hauled to the start and home. The bigger bikes tend to be harder to handle in the technical stuff, tended to produce more injuries during a crash, and just harder to pick up. I was apprehensive going into this ride, wondering if the F800GS had the right mettle (or myself) and whether I should have hauled out my DRZ400S instead. But in the end I was quite pleased with the F800GS Adventure off (and on) road performance, striking a reasonable balance and doing reasonably well amongst the number of Africa Twins present that I have heard so much about. The F800GS Adv also ended up having more range than any other bike on the ride, reaching 300 miles, while the Africa Twin riders were getting twitchy at about 230 miles. The star of the party was a brand new right off the showroom floor BMW R1200 GS Rallye ridden by Joey from Tuscon. He had it outfitted complete with every farkle. Joey is an able and confident rider, and was not afraid to take the expected beating for this ride. But I should add that the riders on each of the now discontinued KTM 990’s seemed to be the apex predators, being quite capable and seemed to be the kings in the mid bike category (albeit they both had very experienced riders: Rich and Mike). If I had the luxury to haul a bike to the start (and home from the end), then I would say the KTM 690 would be the overall bike of choice for the terrain we faced (assuming you address the gas tank range and the seat).
For navigation, each rider had at least one GPS mounted on their bike, with a map (and tracks) provided by GPS Kevin. This was a critical ingredient for staying on course given a lot of the route is off-road without necessarily any signs to guide you otherwise. In order to keep the team together, there would be a rendezvous point every 30-40 miles (donut). This was essential to keep track of any rider that may have fallen behind due to some unforeseen difficulty and may be in need of help. Without these rendezvous points, it would be easy to lose track of a rider. A typical scenario would be for a rider in the lead to miss a turn, and by the time they discovered their error and backtracked, the other riders had now leaped ahead without knowing he or she was now in the rear. The GPS also need to be sufficiently durable and should have a backlighting capability powered by the bike. The two most popular were either a Garmin Zumo of some model, or the Garmin Montana. I used my Garmin Oregon 600 hiking GPS on a RAM mount, but powered by rechargeable batteries. This worked okay, but without backlighting (that could stay on the whole time) it is hard to see when riding into the sun, and a pain to charge the batteries each night. I have decided to upgrade to a Garmin Zumo 395LM as a result of this experience.
To capture still images and video for this ride,
I brought along a Canon G7X higher end point-and-shoot camera. It has
a 1" sensor, a reasonably good quality lens with a focal range of 24-100mm
and aperture of f/1.8, while small enough to keep in my tank bag for quick
access.
 I did not miss the lack of a viewfinder given some of the time I was
photographing with my helmet on.
I did not miss the lack of a viewfinder given some of the time I was
photographing with my helmet on.
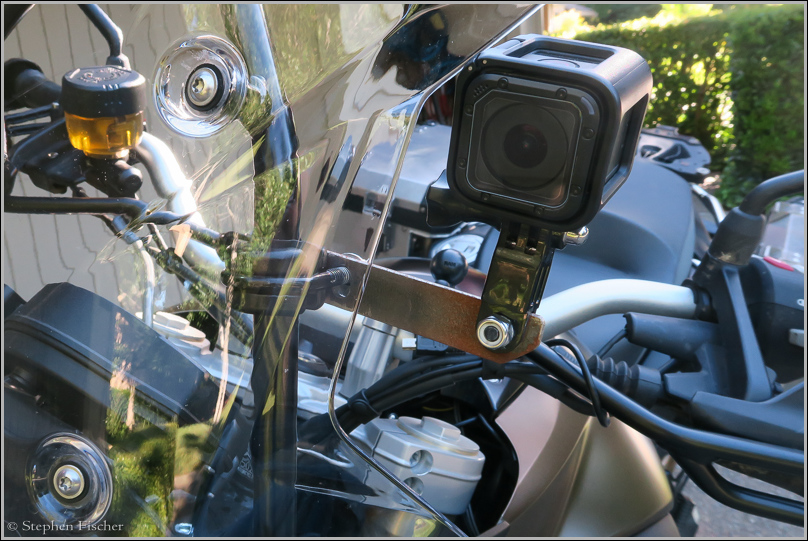
Most of my video was shot with a GoPro Hero Session (4) that I mounted with a custom bracket to the left side of my windscreen. This location is stable with a minimum of vibration, while convenient to access for quickly turning off or on with a one button press, and a blinking red LED on both sides to let me know when it is running. From this location I can also flip it around to point toward me for a selfie mode. The Hero session can capture about 1 - 1.5 hours of video on one battery charge (1080P at 30 fps), which typically was good enough for almost 2 days of riding. During this entire trip I ended up almost filling just two 64GB microSD memory cards with video (and stills), charging both cameras in the motel each night or so. To keep my load light, I did not bring any tripod (except for a small gorilla pod), laptop, or backup device. Instead, relying on just having enough memory cards to last the entire trip, numbering each one so I would not lose track of what was stored on each.
For this blog, I will document each day on a different page, showing the map and some photos in chronological order for the day’s ride, and the experiences encountered along the way. So if you are considering to take the GDR yourself in the future, or just want to learn more about what this ride is like, then read on.
At the conclusion page, GPS tracks and a video of the ride can also be found, along with a post-mortem analysis of my bike and the tires.
Intro Day 1 Day 2 Day 3 Day 4 Day 5 Day 6 Day 7 Day 8 Day 9 Day 10 Day 11 Day 12 Day 13 Conclusion
All content and images are property of Stephen Fischer Photography, copyright 2017. Last updated: 9/4/2017