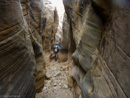
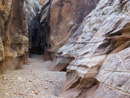
Baptist Draw through Upper Chute Canyon
Stephen Fischer Photography
Rating: 3B-III/IV
It took us two tries before being able explore this rather lengthy canyon. The descriptions on this promised a remarkable and extensive slot canyon, but fraught with some challenges when it is wet due to the amount of debris that can be present in various pockets of this slot. Upper chute apparently is a funnel point for a rather large drainage, resulting in regular large flushings during bigger rain storms. More background information on this canyon can be found here.
The route starts at the top of a mesa of the San Rafael Swell in Sinbad country, drops into a side slot known as Baptist Draw, following it down canyon until it intercepts with upper Chute Canyon. From there you can take either the shorter loop to the north and back to the trailhead in about 3 more miles, or head south following Chute through some deeper canyon terrain for another 2 miles and then following an exit out up Fault Canyon to the west. Taking the route to the south takes a total of about 6-8 hours for a complete loop back to the car. In the end, we ended up taking both routes, hiking up Chute to the north for about a mile, and then doubling back to the south and following that all the way to the exit at the junction with Fault canyon.
On the first attempt the previous year, we spent about 3 hours driving deep into this remote and non-descript area of the San Rafael Swell in our 4wd vehicles and walking around on foot trying to find the trailhead. Our mistake was getting a late start that morning after breaking camp from Goblin Valley after some earlier morning photography, and then trying to interpret the location and return route from Michael Kelsey's tersely written book. With a reported route time of about 6-8 hours, we decided to pull the plug when we concluded we weren't completely sure of the route, and wouldn't make it back within a reasonable time before nightfall, with half the group needing to be head back to California by the next day.
The next try the following year I came armed with better directions and the waypoints programmed into my GPS for both the trailhead and the exit point. We also camped the night before at the trailhead in order to get an early start. The only conflict in the directions was to resolve the most optimal exit route. One approach suggested starting closer to the exit at a location known as Cowboy Camp, and then hoofing it across the mesa to the north for about 2-3 miles before dropping down into the slot for Lower Baptist Draw at a location with a large pyramid shaped formation. The other competing approach suggested starting close to the ledge for descending directly down to Lower Baptist Draw, but then spending more effort on the exit to loop back to the starting point, crossing a couple of canyons in between. We picked the latter, given the temptation to get into the canyon earlier. In hindsight, the former might have been better.
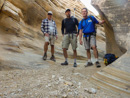
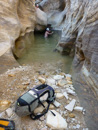
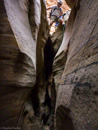
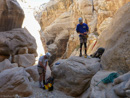
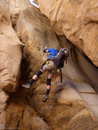
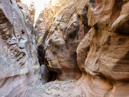
Three of us ended up taking this route as shown in image 2 with John Murray on the left, myself in the middle with a new experimental GoPro rig connected to my pack, and Randy Campbell on the right. With the three of us, we were able to make quick time time down Baptist Draw, with the slowest part where we hit water at a short pour-off. I decided that we may end up just getting wetter from here, and just down climbed into the waist-deep water with my clothes and shoes still on. It was quite cold, being somewhere in the 50's F. John and Randy decided to strip down to their skivvies in order to keep their clothes dry, hoping that further down the water would be less of an issue (see image 5), while I carried everyone's packs to the other side.
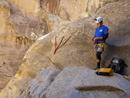
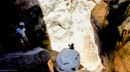
The final rapel that drops you into Upper Chute Canyon was the longest at about 70' (images 8-11). We used a single line rap without incident, applying our newly learned technique for increasing friction for situations like this. I tried using the GoPro on a pole mounted on my pack behind me in an effort for getting a better birds-eye video capture of the descent. But this still needs some refinement in its application as the camera got banged around quite a bit during the descent due to some tight areas and rock overhangs.
Photography-wise, I decided for this trip, given its length and to make better time, to leave my DSLR back at the car. Instead I brought along a Panasonic TS-4 waterproof point-and-shoot along the helmet/pack mounted GoPro Hero 3+. These setups were useful for getting quick and more frequent snapshots as captured here, but are lacking in terms of dynamic range, high ISO performance, and better control over the white balance and focus. They were a useful way for capturing the trip with a minimal of delay to the rest of the party, but I don't feel comfortable with the results for producing high quality prints or for any kind of commercial use. Now if only some manufacturer can produce a higher quaility compact camera such as the Canon G7X or Panasonic LX-100 that has some improved water-proof characteristics... Until then, where practical I will also be carrying the DSLR in a waterproof dry bag in the pack for limited use in more photogenic areas.
<story continues on the next page>


All content and images are property of Stephen Fischer Photography, copyright 2014. Last updated: 11/21/2014