Home brew macro ring light reflector
 Given the price of a ring light style flash, I decided
I could save a little money and build my own and achieve some comparable
results. In a few spare hours on
the weekend I was able to create a ring light style reflector that attaches
to my camera and existing hot shoe based flash.
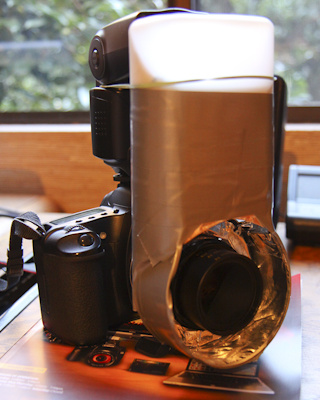
In my case I customized the design for a Canon cropped body like the 50D with a
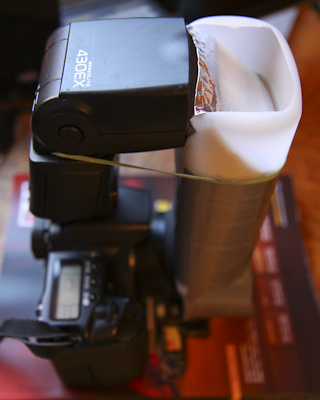
430EX flash and 50mm f/2.5 macro lens.
But the same concept and directions given would readily apply to
whatever camera configuration you may have.
Given the price of a ring light style flash, I decided
I could save a little money and build my own and achieve some comparable
results. In a few spare hours on
the weekend I was able to create a ring light style reflector that attaches
to my camera and existing hot shoe based flash.
In my case I customized the design for a Canon cropped body like the 50D with a
430EX flash and 50mm f/2.5 macro lens.
But the same concept and directions given would readily apply to
whatever camera configuration you may have.
To build this you will need the following:
- Tall cylindrical plastic bottle about 1 foot in height. In my case I used a spent dish wash soap bottle. This will be used as the light tube for transferring the light from the flash head down to the reflector at your lens. Thus, the diameter should be large enough for connecting your flash head to one side of it. Containers that are more elliptical or square in nature when looking at their cross-section profile may work best.
- A cylindrical container typically used for holding
oatmeal. Something around 5” in
diameter should work nicely. You should find one with at least a metal backing if possible to add
some structural rigidity to the design. This will be used as the
framework for a reflector that surrounds your macro lens.
- Reflective metal duct tape (the shinier the
better). Not to be confused with the regular cloth or vinyl style duct
tape. This tape has a metallic layer with an adhesive backing and can be found at any
hardware store for duct work repair.
This will cost about $8-$12 and represent the most expensive
aspect of this project.
- Some regular duct tape.
- A rubber band.
- A sharp knife.
- Heavy duty shears for cutting into the metal back of the oatmeal container.
The following steps can then be followed for building this:
-
Using a sharp knife, cut a hole through the side of the oatmeal
container that is flush with the back edge. If your oatmeal container
side walls are also metal, then you may need tin snips to create this
hole. The diameter and shape of the hole should match the cross-section
diameter of the dish soap container top end that we will later attach to
this side hole opening.
- Next, cut the length of the oatmeal container down to about 2 inches in length, by working around the circumference, keeping the cut as straight as possible. The length of the container after the cut needs to be long enough to support the attachment of the light pipe with the separate hole you created in step #1, while maintaining structural rigidity. On the other hand it should not be so long that it will extend much past the front of your macro lens once it is mounted.
-
Cut a hole in the back of the oatmeal can at the center where the macro
lens will protrude through. There should be about a small amount of play
(~1/16”) to provide space to add the metal duct tape around the edge of
this opening later.
-
Verify after you have made these 3 different cuts in your oatmeal
container that you have not mangled it too severely.
Since this will act as the framework for your flash reflector, if
its structural integrity is questionable, you may have problems later in
terms of getting sufficient useable life from it.
So another try may be needed, chalking up the first attempt as
practice :^)
- Next, using a knife cut a hole at the side of your dish soap container flush to the bottom of it. It is important you make this cut closest to the bottom of your soap container as you will later need to make a separate cut to fold the bottom at a 45 degree angle to act as a reflector (the top is not suitable since the container will typically have a spout at that end). The opening of the hole you cut should match that of your existing flash head. Your flash head when mounted on the hot shoe of your camera should just barely protrude through this hole.
-
 Using your knife, make a cut on 3 sides of the bottom of your container,
preserving the side closest to the hole created in step #5. After making
these cuts, you should be able to bend the plastic down at a 45 degree
angle for the bottom of the container. This will act as a reflector from
your flash head to send the light down to the other end.
Using your knife, make a cut on 3 sides of the bottom of your container,
preserving the side closest to the hole created in step #5. After making
these cuts, you should be able to bend the plastic down at a 45 degree
angle for the bottom of the container. This will act as a reflector from
your flash head to send the light down to the other end. - In this step we will make the final cut in your soap container. Here you will cut off the top end of the soap container at a length and shape that allows the soap container to mate with the oatmeal container hole created in step #1. It is important that you also make this cut at a length such that the soap container length allows it to attach to the flash head as mounted on the hot shoe of your camera at one end, and connect to the side hole of the oatmeal can on the other end with the macro lens protruding through it. Given the circular nature of the oatmeal container, an arc-like cut if possible will provide a better match-up.
- Next, get out the metal duct tape and apply this liberally on the inside of the soap container on all sides. Be sure to also apply it on the inside of the folded down reflector you created in step #6. Try to keep the tape as flat as possible, while minimizing any creases in order to maximize the reflectivity.
- Apply the metal duct tape on inside of the oatmeal can reflector. This should be applied to the back and inside wall. You may want to install a small strip (1/2” wide) of cloth duct tape along the rim edge opening that the lens will protrude through to act as a padding and support a better friction fit when attached to the camera lens.
-
Connect the soap container tube to the oatmeal can reflector with
regular duct tape. You may want to first double check the length and
attachment angle matches your camera configuration as setup with the
flash attached to the hot shoe and macro lens installed.
-
At this point you should be complete. Attach the setup to your camera
with the lens poking through the reflector hole as a friction fit. Apply
more duct tape in ½” wide strips around this lip if it is too loose.
But make sure this does not interfere with the focus ring of the
lens or ability control the manual vs. auto-focus switch. Lastly, apply
a rubber band around the flash and light tube to keep the assembly
together. I hear Canon makes some
“L series” red rubber bands that work better (but they cost about double) if you feel embarrassed about using this out
in the public :^)
You are now done. I have found this works very nicely for close-up macro photography, only requiring you to manually adjust the flash exposure compensation to suite the conditions based on ambient light and the distance you are from your subject. Since this is bulkier then a typical ring light, you may want a separate cinch bag to store this in, as throwing it in your regular camera bag may not be as practical.